All posts by admin

A More A What? Omorovicza!

Ladies and gentleman, it’s official! I am in love.

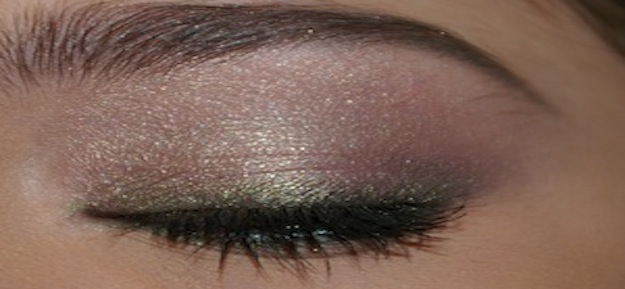
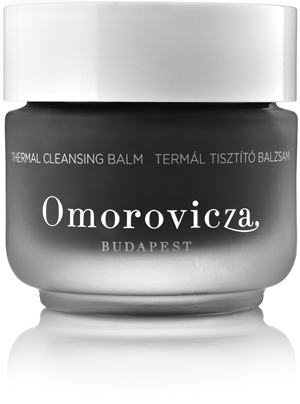
If you haven’t tried Omorovicza Thermal Cleansing Balm, you are missing out.  The cleanser is creamy, smooth, smells of orange blossoms (my favorite), and removed every stitch of makeup I was wearing.  …and I was wearing quite a bit.  Best of all, it left my skin soft, supple, and completely residue free.

The line is based on mineral rich Hungarian thermal waters, renowned for centuries for their healing properties.  The brand’s founders Margaret and Stephen de Heinrich de Omorovicza worked with a Nobel Prize winning Hungarian laboratory of dermatology to develop a new delivery system that allows for mineral absorption into the deeper layers of the skin.  The line is absolutely replete with minerals like calcium, magnesium, copper and gold, a variety of botanicals, and good for you oils like sweet almond, jojoba and calendula.

Happily, I am as thrilled about what Omorovicza doesn’t contain as what it does.  The line is paraben, petrochemical, polyethylene glycol (PEG), silicone, sodium laurel sulfate, synthetic color and synthetic fragrance FREE!  Can I get an amen?!

Quality ingredients come at a price; be warned the line is not inexpensive.  If you have the means however and are accustomed to the cost of high end skincare, you won’t be shocked.  You can purchase Omorovicza on the company’s website, at Neiman Marcus and Sephora.  If you’re in the Chicago area I highly recommend you stop by the Neiman Marcus Northbrook counter.  Speak to Jan Robinson for expert guidance or give her a call at 847.564.0300 ext. 2107 to book a complimentary facial with the purchase of two Omorovicza products.

I tested a few other products from the line last night and am equally pleased, but will withhold comment until I’ve used them for a bit longer.  Stay tuned, I’ll keep you posted!

Stacy

[fblike]

From Clari-meh to Clarisonic Mia

I am old enough to remember the first time Clarisonic type facial cleansing brushes were launched on the American public.  My grandmother bought one for us to use in the 70’s.  It turned out to be a gimmicky thing that didn’t do much for our skin and within a month or two it took up residency under the bathroom sink.

So, when the Clarisonic became popular I was skeptical at best.  Eventually, I bowed to considerable peer pressure, and bought one.  The promises of clearer, brighter and more even skin were just too much to resist.

I used the Mia (I bought the least expensive version, just in case) daily for six weeks, hoping against hope to see SOME change in my skin.  …nothing.  Disappointed again.  Worse, I felt duped.

Solely because of the $150 I paid for the thing, I continued to use it anyway.  Still no real change, but whatever, it did feel good when I let it circulate over my third eye.   ;)

About a month ago, I broke down and bought a new more intense brush head for my Mia, promising “deep pore cleansing”.  Surprise, surprise, the new head did the trick.  Happily, I have noticed better exfoliation, improved texture and a more even skin tone.

Prices have dropped since I bought mine.  A new Mia can be had at Clarisonic.com for $119.  It’s still not cheap by any stretch of the imagination, but should make your skincare products work better, and help increase time between visits to the facialist.

Hello 1984!

Yes, I had electric blue tights with the alphabet spray painted all over them in black.  I also had granny boots, pencil skirts that laced up the back, and many, many a shoulder pad.  I also had, stolen from my mother, a Dior four color eyeshadow palette, with a fab bright blue, orange, green and yellow.  Man I loved that palette…

Anyway I’ve been seeing a lot of these “rainbow” eyes lately and was just in the mood.  Nowadays I’d probably wear this with a nude lip, back in the day, however, shocking pink, purple or bright orange would have suited me better.

1.  Urban Decay Eyeshadow Primer Potion all over.

2. L’Oreal HIP Striking Duo (the yellow side) all over the lower lid, around the inner eye, and line 1/4 the way across lower lashes.

3.  L’Oreal HIP Perky Duo (the green side) outer 2/3 of lower lid.

4.  Elf Mineral Eye Shadow in Sweet patted in middle of lower lid, not blended at all.

5.  Urban Decay Mildew in outer corner and crease, getting softer toward inner crease.  Use to line under lower lashes from outer corner to about 1/2 way in.

6. L’Oreal HIP Perky Duo (green side) blended under lower lashes out of Mildew toward yellow.

7.  L’Oreal HIP Perky Duo (gray side) very softly above outer corner of upper lashes, and outer corner of lower lashes, like a “V”.

8.  Smashbox Eye Shadow in Oyster under brow bone.

9.  Maybelline Great Lash Mascara Blackest Black.

10. Laura Mercier Blonde brow pencil.

No one said it was going to be simple.  :)

[fblike]

Eye Makeup Application for Glasses Wearers

When I was 9 years old, my grandmother called me in to her room and asked me to put her eye makeup on for her.  She couldn’t see what she was doing without her glasses and said she was “making a mess.”  I had no idea how to begin and followed her instructions closely.  Ultimately I’m not sure if my first attempt was any better than what she could have done, but she was happy.  Eventually I got better at it for her.

Today I saw a post from a young woman who wears glasses and wants to wear eye makeup but is unable to see well enough to do her eye makeup without them in place.  So far she’s been able to put on a little mascara, but has yet to venture further.  This got me thinking about the best way around the problem; my brain landed on cream shadows and smudged eye pencil.

The creams are easily applied with fingertips, and the pencil line doesn’t have to be perfectly straight.  This is the eye I did for the young woman in the posting.  I hope she likes it.

Eye for glasses wearers


I kept it pretty natural so mistakes won’t matter as much, and because it’s her first real foray into eye shadow.

1.  Laura Mercier Platinum Creme Eye Colour all over, applied with finger tips.

2.  Laura Mercier Alloy Creme Eye Colour from the lash line blended up to the crease with finger tips.  Rose Gold from L.M. would work beautifully here for daytime as well.  Any deep tone cream color would be great in place of the Alloy for a more dramatic evening look.  Just make sure to use a darker colored liner (step 3) that’s  compatible.

3.  Urban Decay Glide on Pencil in Bourbon across top of the lashes.  Then smudged with either a smudge brush or finger tips.

4.  Maybelline Great Lash mascara in Blackest Black.

5.  Laura Mercier Blonde brow pencil.

[fblike]

Ooh Ahh Alpha Beta

Yeah, I did it…I referenced “Revenge of the Nerds” in print.  What brought me to this low state you ask?  Happiness in a bottle I say, happiness in a bottle.

Here’s the deal.  Over the years I’ve battled breakouts, spent time roasting in my beautiful Miami sun (sniff, I miss you), and been in many ways not so kind to my skin.  The result is not terrible skin, but certainly not the perfectly smooth and even toned, porcelain skin I would like.

So what do you do when the scrubs, exfoliating washes, masks and serums aren’t cutting it?  Well, if you have lots of disposable income you can go see the dermatologist for some pricey laser treatments and peels, OR, you can do what I did.  I turned to the bottle: those beautiful amber glass bottles…

Check out this site skin-peel.com.  For about the price of one peel at the dermatologist’s office, I bought a bottle of Salicylic and a bottle of Glycolic, resulting in the Alpha Beta Peel of a life time.  What’s more, there are about 14 applications per bottle AND each bottle came with a peel prep solution as well as a neutralizing solution, (they also threw in some gauze pads for good measure).

The range of peels they have is phenomenal.  They sell every peel I’ve ever heard of and more, in a variety of strengths, as well as post peel skin care. (I can’t endorse the skin care as I’ve not tried it yet.)

Furthermore, their customer service is excellent.  I called once before placing my order to ensure I was purchasing the right products in the right strengths for my skin.  Then called again, after receiving the products, just before my initial application to make sure I had the timing right. Putting acid on my skin is not something I take lightly, nor should you.  I’m happy to say it’s not something they take lightly either.

My end result was a smoother complexion, and truly radiant skin.  Honestly, I am really pleased with this purchase, and will definitely be a return customer.


[fblike]


Cat Eye in Neutral Tones

Brown Cat EyeThis is one of my all time favorite looks.  It’s simple yet dramatic, clean, and looks good on everyone.  Furthermore, it can be worn with any lip color.

These are the steps I took and the products which were used to create this eye for you.

1.  Laura Mercier Linen Eye Basics, eyeshadow base all over.

2.  Smashbox Oyster eyeshadow, pressed on with a flat, not fluffy, eyeshadow brush,  just under the eyebrow to highlight the bone.

3.  Studio Gear Barely There matte eyeshadow from lash line to crease.

4.  Laura Mercier Cafe Au Lait eyeshadow very softly applied to the crease.  Please refer to my post “The Salt Analogy” here.  Less is more and the brush you use matters.  I used my Bobbi Brown eye blender brush,  because I just wanted a soft shading in the crease.  Sort of an enhancement of the natural shadow created by her brow bone.  The darker color in the outer color is not Cafe Au Lait, it’s step 6.

5.  Laura Mercier Black Ebony cake eye liner applied with a pointed eye liner brush.  I started at the outer corner of her eye and did the little wing bit first, by pulling the line up slightly.  I didn’t want an extreme cat eye; I was going for something that would elongate the eye when opened and look relatively natural.  From there I picked up my brush and began a new line, extremely tight to the lashes, about 1/4 of the way out from her inner corner.  I pulled the line out to meet the furthest tip of the wing, gradually allowing the line to get thicker as I reached the outer corner.

6.  Laura Mercier Coffee Ground eyeshadow applied carefully and gently to the outer corner of the eye.  I used this deep tone to give depth to the look.

7.  Laura Mercier Brunette brow pencil.

8.  Maybelline Great Lash Mascara in Black applied only to the outer upper lashes.  This application furthers the effect of the “cat eye”.

I apologize for for the quality of the photos today, but was working with a very unruly model.  …ahem…

Happy painting!  Let me know how it goes!  S


[fblike]

Don’t It Make My Brown Eyes Green?

Plum and green might not sound like the most natural of combinations, but they are.  Red and green enhance each other, they’re opposites on the color wheel…suffice it to say, one makes the other pop.  So, if you have even the slightest hint of olive in your beautiful brown eyes, any eyeshadow with a little red in it (think plum, reddish brown, copper, etc.) will enhance the green in your eyes.

If your eyes are already green, or blue for that matter, colors with a red undertone should be a staple in your eyeshadow collection.  I added a bit of green to this look to further the effect of bringing out the green in her eyes, and also because I just think the colors are really lovely together.

Regardless of your eye color, this is a look that works well on pretty much anyone.

1. Laura Geller Eye Spackle Primer

2. Laura Mercier Platinum Metallic Creme Colour all over.

3. Laura Mercier African Violet lash line to crease.

4. Laura Mercier Black Caviar Liner blended into upper lashes.

5. Urban Decay Mildew Eyeshadow smudged into Caviar liner and around entire eye.

6. Laura Mercier Black Turquoise Kohl Eye Pencil on the water line (inside lower lashes).

7. Laura Mercier Brow Pencil in Brunette.

8. Maybelline Great Lash Marcara in Black.


[fblike]

Loving Too Faced Perfect Eyes Liner!


I have found true happiness in an eyeliner. There are a million liners that work just fine for lining the outside of the eye, and many that work well on the inside, but this one, bless it, actually stays put…for eight hours no less.

Gone are the constant trips to the bathroom to re-line the inside of your eyes. Be fearless! Go for the drama, and rest assured you’ll spend the evening looking more vamp and less vampire. Paint it up!

[fblike]

“It’s Like Buttah…”

Let’s talk nails. I am completely, totally and thoroughly smitten with Butter London’s nail polish.

Why you ask?  Well, I’ll tell you!  First of all their products are non-toxic, formaldehyde, toulene, and DBP free.  Formaldehyde?  Really?  Must we?  Apparently not!   Secondly, their lacquers wear well and live up to their name…smooth as butter…  Lastly, the colors are simply stunning.

…and when I say stunning, I’m not just whistlin’ Dixie.  I hate to admit this, because I know it sounds terribly vapid, but I caught myself staring at my nails repeatedly while wearing Chancer.  What can I say?  It’s mesmerizing!  Butter gives such depth to sparkly colors.  We’ve all seen poorly done sparkle before, huge chunks of glitter floating in a thin barely pigmented lacquer; rest assured, you get what you pay for with Butter.

Check out the Nail Foundation Flawless Base Coat and the Hardwear PD Quick Top Coat.  The base smooths nails out beautifully and the top coat gives your nails a glassy, still wet looking finish.  Love, love, love Butter.

You can buy Butter at Nordstrom, Ulta, or here…direct from the source.


[fblike]